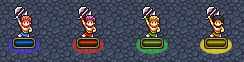
Example of 4 units in the same class. From left to right: player, enemy, ally and neutral
Creating a neutral unit
To create a neutral unit, first you need to create a normal unit and assign it the custom parameter {neutralFaction: true}. You can use this parameter for any type of unit, although it is recommended to only do it for ally or enemy units, because player untis don't have AI Patterns, so you can't change their behaviour. This "neutralFaction" is the only parameter you need to make the plugin work. There are other options that you can modify, but they are optional.Hidden units
If you want the unit to be a obstacle, like a breakable wall or a tree, you can also use the parameter {neutralHidden: false} so it won't count as a real unit.Event command - Change a unit to/from the neutral faction
You can create an event command that changes a normal unit to a neutral unit or viceversa. To do this, create an "Execute Script" event command and select the "Call Event Command" option. Also, set the Object Name to "NeutralAffiliation". Finally, go to the Original Data tab on the event and select the unit you wish to change.Assign music file to the neutral faction
By default, the neutral phase will have the same music used in the enemy phase, unless it is specified through a map custom parameter. The parameter is called "neutralMusic", and it cointants two values: a value specifying if the music is default from the engine (true) or imported (false), and an id value to specify which song the map will use. For example: { neutralMusic: { id: 4, isRuntime: false } } will use a song that was imported by the player (the value in "isRuntime" is false) and with the ID 4.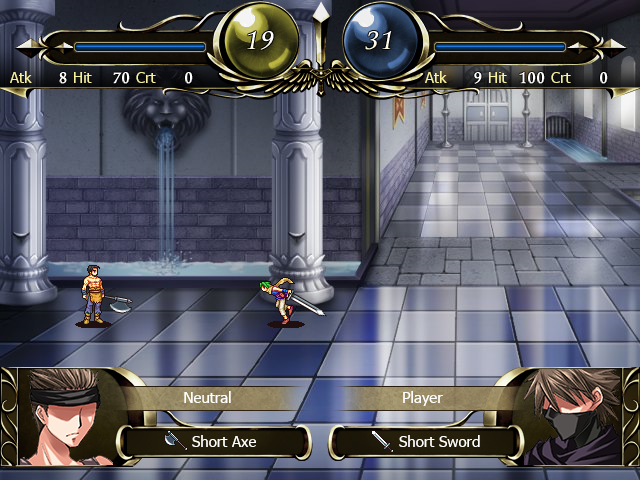
A neutral unit being attacked by a player unit. Note how the both the battle sprite and the life crystal of the neutral unit have the color yellow.
Graphic settings for neutral units
By default, all neutral units use the same map and combat sprites as other units from their original army. If you want to change this, there are several possible changes:- Battle sprites: to change the color of the battle sprite, add the custom parameter "neutralMotion" to the unit's class. The value represents which color to use: 0 is default for player army, 1 for enemy army, 2 for ally army and other numbers are used for custom colors. For example: {neutralMotion: 3} will change the color to the first custom color.
-
Map sprites: adding custom map sprites for neutral units is a bit more complex than the battle sprites: first, you need to add a custom parameter "neutralCharchip" to the unit's class, which will have three values: isRuntime, id and colorIndex.
- isRuntime determines if the sprite comes from the engine (true) or if it is imported by the user (false).
- id represents the ID of the imported sprite.
- colorIndex is the color assigned to the army. If colorIndex is 0, then the first three columns of the map sprite will be used, which is the same used by the player army. If the colorIndex is 1 or greater, it will use custom colors added by the user, which will cover the next columns of the spirte.
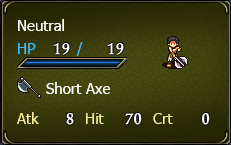
Note: to use the values of SYMBOL_COLOR and GAUGE explained below, you need to make sure that the neutral unit has a custom map sprite assigned with this method. - Battle Life Crystal: by default, there is a "battle crystal" asset that contains the current HP of the unit during the battle screen. That asset has a different color for each army, but it actually has 4 variants: blue for player army, red for enemy army, green for ally army, and an unused yellow variant. Every neutral unit will use that fourth yellow variant, without the need to use any custom parameters. This will also apply to any custom variant of the battle crystal that you would import to the project.
Example assets used for the FRAME and WINDOW settings
Customization of global settings
The plugin comes with a file called _settings.js that can be openend and edited without any programming knowledge. You can open it with Notepad or any other text editor. The file comes with different variables, each of them with a default value assigned. Here is the list of the variables and the explanations of what each one does:-
FRAME: this is the graphic shown when the phase of the neutral army starts. By default, the "Enemy Phase" graphic is used.
To import a frame, you have to make sure the asset is in the UI->screenframe category. This can be accesse in the option Resources->UI.
To change the asset, you need to change two values, one of them is the ID of the asset and the other is a boolean:
- isRuntime: true if the asset used is a default asset that comes with the engine. False if it is an imported asset.
- id: the ID of the selected asset.
-
WINDOW: this is the texture used for the neutral army on some windows. By default, it uses the same texture as the enemy army.
To import a window's texture, you have to make sure the asset is in the UI->menuwindow category. This can be accesse in the option Resources->UI.
To change the asset, you need to change two values, one of them is the ID of the asset and the other is a boolean:
- isRuntime: true if the asset used is a default asset that comes with the engine. False if it is an imported asset.
- id: the ID of the selected asset.
-
ADD_OBJECTIVE_WINDOW: a boolean value, can be true or false. If it is true, the neutral army will be shown separated from the enemy army when looking at the Objective screen.
If it is false, both armies are shown as one.
Note that if you make this variable true, the Objective screen will be wider, so it may not fit in the screen when using small maps. - NAME_FACTION: The name of the neutral faction. Used by the objective screen if the above value is set to true. By the default, the faction has the name "NEUTRAL".
- SYMBOL_COLOR: RGB value, used to determine the color of the shadow under the unit when the setting "Map Unit Symbol" is enabled. The default color is 0xECD932 (yellow) This only works if the unit's class has a custom map sprite for the neutral army.
-
GAUGE: this object is used to render the HP bar over the map sprite when the setting "Map Unit HP" is set to "Gauge".
By default it uses the same HP bar as the Ally army (green gauge).
To use this, you need to specify the values called "isRuntime", "id" and "colorIndex":
- isRuntime: true if the asset used is a default asset that comes with the engine. False if it is an imported asset.
- id: the ID of the selected asset.
- colorIndex: a number between 1 and 3. If you look at any gauge asset, it has 4 bars: the first one is the empty bar, and then there are the player, ally and enemy bars, which are associated with the numbers 1, 2 and 3 respectively.
Insert screenshot of a lot of neutral charchips here